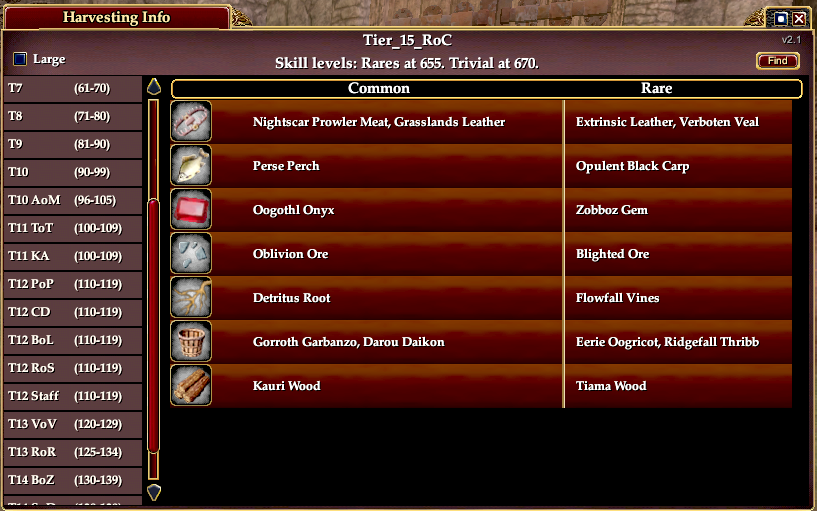
This is a custom window that consolidates the harvesting levels, materials, zones, node names, and skills into one window. One goal was a fairly compact window that still has all the information. The zone and node names are shown in a pop up window when you click the material's icon. The UI includes a "Find" function in case, for example, you need some cobalt and don't remember where it comes from.
Since it is a custom window, you need to enter a command to display it. The command is:
Code:
/show_window Custom.HarvestingInfo
You can put this command in a macro.
Releases:- Version 2.1
- Includes through Rage of Cthurath.
- Added a track harvestable button in the Zone and node name pop up window. See Notes for caveats.
- Version 2.0
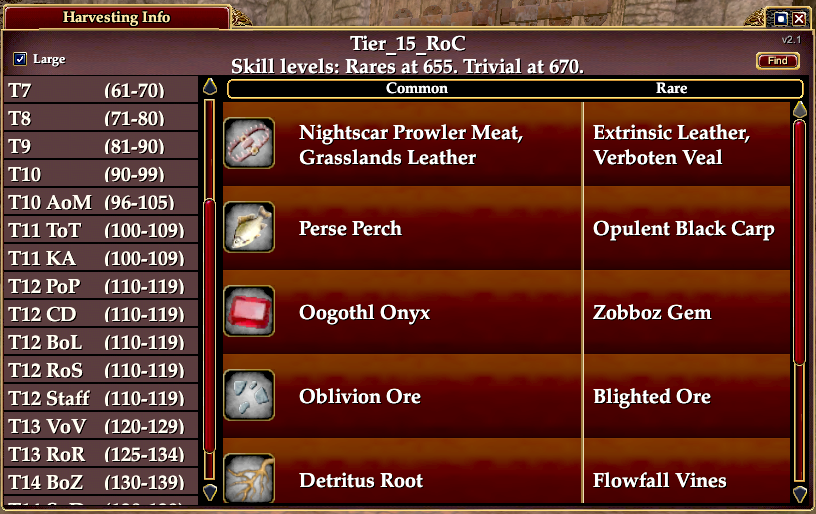
- Add large / normal font selection.
- Zone and node name pop up window now toggled by clicking the node icon (instead of a tooltip).
- Some other changes in the XML file for easier maintenance.
- Version 1.1 - Includes up through Scars of Destruction.
- Version 1.0.1 - Includes up through Ballads of Zimara.
Notes
Tracking
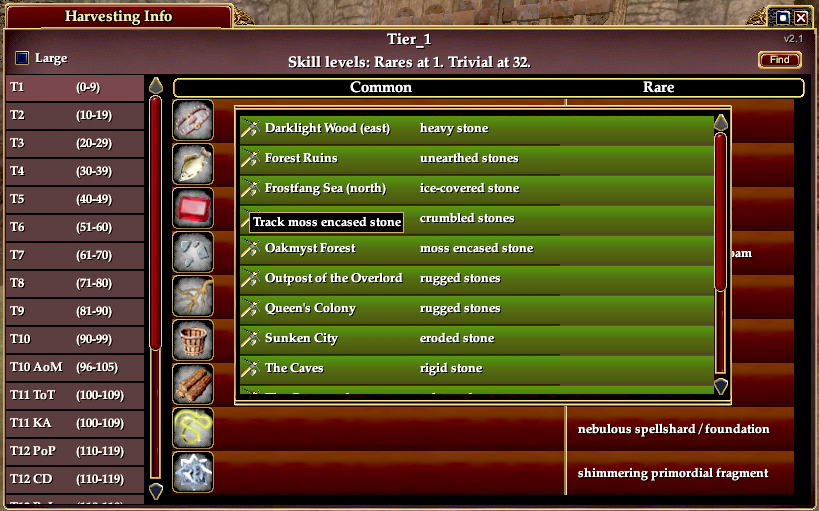
Clicking the icon for a material toggles the zone popup window opened or closed.
Clicking the track harvestable button in the zone popup window will open the game's
Tracking Harvestable Resources window (if the player has that ability) and set the filter to the node name for that zone. When the filter text for the
Tracking window is set programmtically like this, the
Name list is typically slow to update to match the filter. The quickest way to get the tracking window to update with a filtered list is to close it and reopen it (via any available
Track Harvestables button). It seems that another way to update the list is to move your character around a bit in the game, maybe until some other node becomes the closest to you and the list re-sorts, and as a side effect applies the filter. This feature works with the default UI and DarqUI. It may not work with other UI's if they use a modified
Tracking window.
Naming
Since there are differing examples of "tier" number in other sources, I've just picked a method based on the level of the materials gathered, which was the approach used by the game for the first 9 levels. The Tier number in the UI was determined by:
Code:
Int(((low_end_of_the_item_range) / 10) + 1)
So the first tier = (0/10) + 1 = Tier 1.
AoM = (96/10) + 1 = 10.6, drop the fraction = Tier 10.
Maybe this whole approach will turn out to be even more confusing in the future with more 5 level expansions expected, and we should just use something else starting at about Tier 10.
The shadowed harvests on the moon (tab "T12_Staff") are just arbitrarily split between the "Common" and "Rare" columns since they have long names, are all flagged as "rare", and the den materials won't fit in one column.
Skills
Minimum rare skill at T12 is probably correct (tested as best I could figure out). Those nodes themselves tell lies.
I believe skill requirements in general are correct, even though some of these might disagree with other sources.
I did not include the Great Divide harvests that are only available if you are on a quest.
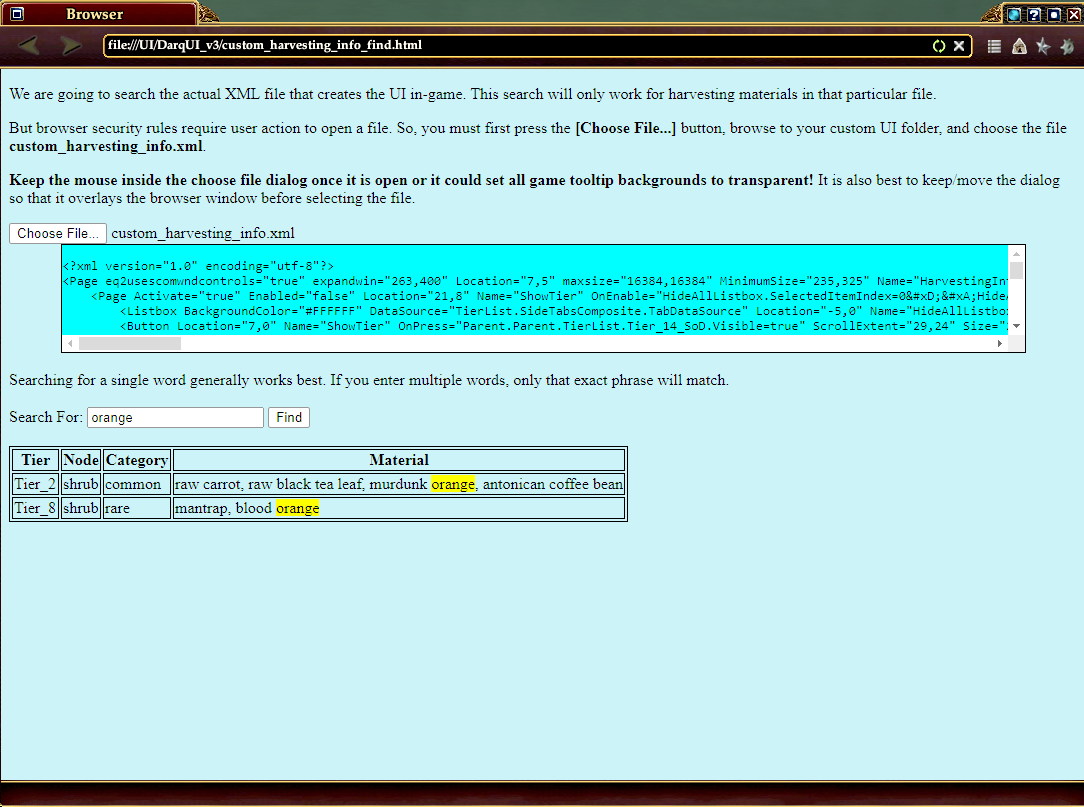
Find
I really wanted an in-game "find" capability. But I also want ease of maintenance. Due to limited capabilities in the UI, I ended up using the browser. The browser implementation is also a bit quirky. You pretty much have to use the mouse for everything other than typing the search word(s). (For example, the "Searching For:" box doesn't recognize the <Delete> or arrow keys, I suspect because the game itself captures a lot of keys.) But the basic find function works (implemented in the .html file) and should not require any maintenance when adding zones.
And the browser has
this one weird trick! In the browser, when you press the [Choose File..] button and the dialog opens, if you mouse over a game element that contains a tooltip, the game will set transparent backgrounds for all the tooltips in the game. That's pretty annoying. The only fix seems to be to reload the UI. So, once that file browser dialog is open, keep the mouse inside it (and maybe it helps to move the dialog so it's on top of the browser window) and choose the "custom_harvesting_info.xml" file expeditiously.
Installation
If you already have a custom UI (even if you're using the Default UI with EQ2MAP, the ...\UI\EQ2MAP folder works):
- Unzip the files into your custom UI folder, e.g. "C:\Users\Public\Sony Online Entertainment\Installed Games\EverQuest II\UI\DarqUI_v3".
- If this is the first time installing this window:
- Edit the "eq2ui_custom.xml" file in your custom UI folder.
- If there is no existing file by that name, create one with the following contents:
Code:
<?xml version="1.0" encoding="utf-8"?>
<Page IgnoreTab="false" ismodule="true" Name="Custom" PackSize="1,1" ScrollExtent="1024,768" Size="1024,768" Visible="false">
  <include>custom_harvesting_info.xml</include>
</Page>
- If there is an existing "eq2ui_custom.xml" use any text editor like Notepad to add the following line near the end of the file above the "</Page> line, and save the file:
Code:
<include>custom_harvesting_info.xml</include>
- (Re)load the UI.
- You can either restart the game if it's running, or start it if it wasn't running,
- or use the /loadui command in-game to switch to a different UI (e.g. the Default one) and then back to your preferred UI. Note that this approach tends to rearrange window locations and/or sizes.
- Once the UI is reloaded, the "/show_window Custom.HarvestingInfo" command should work.
If you do not already use a custom UI, you'll need to create one. This is described in the
FAQ
Maintenance
Since this window will need updates as new harvest areas and materials are released, I tried to figure out how make that easy. But there are still several steps required. What follows is my process in case someone else wants to use it (and to remind my future self how to do it):
Preparation
- I used the EQ2UIBuilder for most of the XML editing. Rather than add them to the builder, I used Notepad++ to edit the template xml files. The template files should not need to be changed when just adding a new zone/level tab. I used Visual Studio Code on the html file, also not required unless you break the find function by doing some other major changes.
- Or, you could just use your favorite XML/HTML editor for everything.
- It's best to edit in a development folder, then copy to the appropriate game UI folder once things are working in the UIBuilder.
- After opening the "eq2ui.xml" file, the window is found in the UIBuilder tree under the Custom page as HarvestingInfo. To see it in the visualizer, click the right arrow on the tabs line multiple times to scroll such that the "Custom" tab is visible and click that. To see the one you're working on, visibility of the various Custom windows may need to be toggled using the eyeball in the lower section of the tree.
Adding a zone
To summarize the Detailed Steps that follow:
- Add an element to TabDataSource so that a new tab is created for your new page.
- Add a new page based on the Tier_Skeleton page and add all the harvesting details to it.
Detailed steps:
- In the UIBuilder tree, select the Custom.HarvestingInfo.TierList.Materials.Tier_Skeleton. Then use the menu Edit / Duplicate.
- In the UIBuilder tree, open pages down through Custom.HarvestingInfo.TierList.SideTabsComposite.TabDataSource. Select the bottom entry, currently Tier_14_SoD. Then use the menu Edit / Duplicate.
- One of the UIBuilder quirks is that newly inserted items do not show up in the tree at the position they are actually placed in the XML file. So, before editing the new items, save the current file using menu File/Save (or <Ctrl>-s, or the single disk icon). Then re-open the file using menu File/Recent Files and choose your eq2ui.xml. Either answer to the "Would you like to save your workspace" pop-up is OK.
- Navigate back to Custom.HarvestingInfo.TierList.SideTabsComposite.TabDataSource and select the duplicate entry which is now at the top of the list. Use the blue down arrow at the top of the tree to move it down so that it is the last item. While it is selected, change the information for the new zone tab in the bottom section of the tree window.
- The "Name" field cannot have spaces and must match the name you're about to give the new Tier_Skeleton in the next step. The "Name" is displayed at the top of the page.
- The "tier" and "level" fields are displayed in the zone tab.
- The "skills" field is displayed at the top of the page.
- Navigate back to Custom.HarvestingInfo.TierList.Materials and find the new Tier_Skeleton at the top of its sub-pages. Select it and use the blue down arrow to move it down to between the previous last tier and the old Tier_Skeleton. While it's selected, change the "Name" field to match the name you just entered in the TabDataSource in the previous step. Wouldn't hurt to do another File/Save at this point.
- The material data is in the MatsDataSource under your new re-named Skeleton. Click on den for example and in the lower section of the UIBuilder enter the data about materials gathered from dens.
- The icons currently in use are found in the Custom.HarvestingInfo.TierList.Materials.NodeImages page. The easiest way to add a new one is to Edit / Duplicate an existing one and change the ImageStyle and ImageFrame attributes. The ImageStyle name then goes in the "image" field of the MatsDataSource element.
- The icons are obtained from game image files in the ...\images\icons folder(s). When looking for a new icon, it's easier to browse those files with some other program to at least find the right file. The File Explorer preview pane or Paint.Net are free options. The icon will probably be in an "icon_is" file (of which there are a lot - good luck).
- The zone and node names are in the other DataSources, e.g. DenDataSource, FishDataSource, etc. The Tier_Skeleton provides two dummy zone entries for each node.
- Change the "Name" field to the actual zone name.
- Change the "node" field to the node that provides the material.
- The Edit / Duplicate menu is the easiest way to add more zones to the data source.
- Update the version number in Custom.HarvestingInfo.WindowFrame.Version.Text.
- If you want your new tier to be the one shown when the window is first opened in-game (you probably do), save the file while your new tier is the one selected in the visualizer while it's "running".
Testing in UIBuilder
Set the
Custom.HarvestingInfo window visible in the tree and in the visualizer window scroll to the Custom tab. Press the green "run" arrow and the window should function (except for tooltips, saving the font size, and the [Find] button). To see the icons, you may need to press the "refresh" button (right next to the green "run" arrow) on each page that needs a different icon. Make sure your new data is correct.
Testing In-Game
Copy the "custom_harvesting_info.xml" from your development folder to your active UI folder and reload the UI (either restart the game, or /loadui to switch away from your active UI and back again).
You shouldn't need to update the template files or the html file, unless you made bigger changes than just adding a zone.
(Note that updating from version 1.x to version 2.0 requires replacing the 1.x templates with the 2.0 versions.)